Monday, September 13, 2010

PRINTER SETTINGS IN MAC

MAC OS 9
CHOOSING PRINTING OPTIONS

Use the print dialog to choose your printer and select options for how you want your document to print.

1. Open the document you want to print.

2. If you wish to change the paper size or page orientation, choose File > Page Setup.

3. Choose File > Print.

4. Select your printer from the Printer pop-up menu.

5. If you wish to change any printer driver settings, select the necessary options in the print dialog. You can select more options from the Copies & Pages menu.

6. Click Print.

Tuesday, August 24, 2010

Others Paper Recommendations for Oki c5800


Transparencies


Should be of the type designed for use in copiers and laser printers. We strongly recommend Oki PrintingSolutions transparencies (Order No. 01074101). In particular,avoid office transparencies designed for use by hand with markerpens. These will melt in the fuser and cause damage.

Labels

Should also be of the type recommended for use incopiers and laser printers, in which the base carrier page isentirely covered by labels. Other types of label stock maydamage the printer due to the labels peeling off during theprinting process. Suitable types are:
• Avery White Laser Label types 7162, 7664, 7666 (A4),or 5161 (Letter)

Paper Recommendations for Oki c5800


Your printer will handle a variety of print media, including a rangeof paper weights and sizes, transparencies and envelopes. Thissection provides general advice on choice of media, and explainshow to use each type.The best performance will be obtained when using standard75~90g/m² paper designed for use in copiers and laser printers. Suitable types are:

• Arjo Wiggins Conqueror Colour Solutions 90g/m²;


• Colour Copy by Neusiedler.


Use of heavily embossed or very rough textured paper is notrecommended.

Envelopes

should be free from twist, curl or other deformations.They should also be of the rectangular flap type, with glue thatremains intact when subjected to hot roll pressure fusing used inthis type of printer. Window envelopes are not suitable.


Thursday, July 15, 2010

Configuring an IP address

Configuring an IP address on the Fast Ethernet 7100e+
The factory default IP address on the Fast Ethernet 7100e+ is 0.0.0.0. There are many ways to configure an IP address on the Fast Ethernet 7100e+ which are briefly described below.
1. Using the Oki Setup Utility: The setup utilities supplied with the Fast Ethernet 7100e+ can be used to configure the IP address. There are utilities for all Windows platforms (except Win3.1 16bit API) which will discover each 7100e+ on the network and then allow you to change the address.
2. Using DHCP: Dynamic Host Configuration Protocol (DHCP) is a dynamic method of assigning the IP address to the NIC. On startup the NIC sends a request for an IP address and a DHCP server will respond. This method requires a DHCP server to be installed on the network.
3. Using BOOTP: The Bootstrap protocol (BOOTP) is a dynamic method of assigning the IP address to the NIC. On startup the NIC sends a request for an IP address and a BOOTP server will respond. This method requires a BOOTP server to be installed on the network.
4. Using RARP: The Reverse Address Resolution Protocol (RARP) is a dynamic method of assigning the IP address to the NIC. On startup the NIC sends a request for an IP address and a RARP server will respond. This method requires a RARP server to be installed on the network.
5. Using Ping & ARP commands: The IP address can be temporarily assigned using the “ping” and “arp” commands on either a PC or a UNIX station. The following steps should be taken to set the address using this method:
  • Register the IP address and Ethernet address in the workstations ARP table using the following commands
  • Ø arp –s (PC)
  • Ø arp –s temp (UNIX) The can be obtained from the menu print of the printer and the is the address you want to set.
  • ping
  • The IP address should then be permanently assigned using one of the other methods listed or via the WebPage or TELNET

Tuesday, June 29, 2010

TONER SENSOR RESET ON A C5800


This probably won’t help if you have physical damage to the toner drum

1 Just like all other instructions, get into the special menu by holding down the menu+ and menu- keys while turning the unit on.
2 When you see the message "OKIUSER" CAREFULLY release both buttons at the same time.
3 Use the menu- or the menu+ to get to "ENGINE DIAG MODE".
4 Press enter. DIAGNOSTIC MODE XX.XX.XX will appear.
5 Now press both the online and the back buttons, and "ENG DIAG LEVEL 4" will be displayed.
6 Press enter.
7 Press menu+ twice to "ENGINE PARAMETER SET 2"
8 Press enter.
9 Press menu+ twice to get to "TONER SENSOR ENABLE" (with a * in the lower right hand of the display window.
10 Press enter and the word "ENABLE" will begin to blink, indicating it can be changed.
11 Press menu+ and the word will change to "DISABLE", still blinking. This is a toggle, make sure to not hit the button twice.
12 This is the important step: simultaneously press the online, cancel, and back buttons, and let them all go simultaneously. this sets your selection.
13 There are other things that can be done here in the same fashion, but that is out of the scope of this document.
14 Use the "BACK" and the "MENU-" keys to back out all the way to the message "INITIALIZING", then power off, wait 10 seconds, and power back on.

Friday, June 18, 2010

How do I find and resolve Toner Sensor Errors?

Please carry out the following instructions if you receive one of the following error codes:
540 Toner Sensor Error, Colour: Yellow541 Toner Sensor Error, Colour: Magenta542 Toner Sensor Error, Colour: Cyan543 Toner Sensor Error, Colour: Black
The printer contains four image drums; cyan, magenta, yellow and black.


There are two sensors for each toner: one on the drum and one on the machine

  • The toner sensor is located on the right hand side of the drumThe

  • Toner sensor on the machine can be found on the right hand side panel of the machine on the inside Toner Sensor Errors


A toner sensor error is displayed when the machine is no longer able to detect the toner cartridge / drum unit, or is no longer able to determine how much toner is left in the units.

How to clear the Toner Sensor Errors

If your printer displays a toner sensor error please power off the printer and check the following:Check that all the blue toner levers are pushed firmly towards the back of the machineCheck if the sensors need to be cleaned. The sensor is located behind a plastic cover on the side of the drum (see below). Remove the plastic cover and give the silver arm a clean with something small and soft (lint free), any toner that has built up on the sensor will be a very fine powder and should be easy to remove.Check if the sensor lever has been pushed up. Once you have cleaned the arm, check that the sensor lever has been pushed up

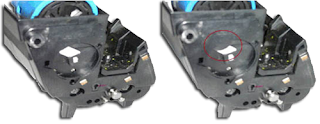
If it is incorrect it can sometimes result in the blanking disc not being pulled out of the way, this results in the sensor on the machine not picking up the sensor on the drum. Pushing the disc up will resolve the problem. The disc will not fall back down again, providing that the blue Toner Lever is pushed firmly to the back of the machine.
After all these checks are completed place the cover back on the side of the drum. It should go back on the same way it came off. If you are unable to fit the plastic cover on the drum, you can leave it off as it will not stop the drum from printing.
Install the drum and toner in the machine and switch on, if you still have an error message please contact your local OKI Printing Solutions office for further assistance.

Wednesday, June 2, 2010

Printer okidata C5800 Error Codes

Machine Check Exception Error Code 001
A serious problem has been detected on the CU board
Solution:
Seek attention of service person if restarting the printer does not correct the problem.


DSI Exception Error Code 002
When the program has attempted to look up an invalid address
Solution:
Note the 24-digit addresses (usually 3), then restart the printer. Check reproducibility if possible. Repeat the same operation after restarting the printer and check if the same service call message appears

ISI Exception Error Code 003
When the program has attempted to look up an invalid address
Solution:
Note the 24-digit addresses (usually 3), then restart the printer. Check reproducibility if possible. Repeat the same operation after restarting the printer and check if the same service call message appears.


Alignment Exception Error Code 004
When the program has attempted to look up an invalid address
Solution:
Note the 24-digit addresses (usually 3), then restart the printer. Check reproducibility if possible. Repeat the same operation after restarting the printer and check if the same service call message appears.


RAM Configuration Error Error Code 034
RAMs have been mounted in the wrong order
Solution:
Check the specification and install the RAMs in correct order.

Warning: The green image drum surface is very delicate and light sensitive. Do not touch it and do not expose it to normal room room light for more than 5 minutes. if the drum unit needs to be out of the printer for longer than this, please wrap the cartridge inside a black plastic bag to keep it away from light. Never expose the drum to direct sunlight or very bright room lighting