- Register the IP address and Ethernet address in the workstations ARP table using the following commands
- Ø arp –s
(PC) - Ø arp –s
temp (UNIX) The can be obtained from the menu print of the printer and the is the address you want to set. - ping
- The IP address should then be permanently assigned using one of the other methods listed or via the WebPage or TELNET
Thursday, July 15, 2010
Configuring an IP address
Tuesday, June 29, 2010
TONER SENSOR RESET ON A C5800
This probably won’t help if you have physical damage to the toner drum
1 Just like all other instructions, get into the special menu by holding down the menu+ and menu- keys while turning the unit on.
2 When you see the message "OKIUSER" CAREFULLY release both buttons at the same time.
3 Use the menu- or the menu+ to get to "ENGINE DIAG MODE".
4 Press enter. DIAGNOSTIC MODE XX.XX.XX will appear.
5 Now press both the online and the back buttons, and "ENG DIAG LEVEL 4" will be displayed.
6 Press enter.
7 Press menu+ twice to "ENGINE PARAMETER SET 2"
8 Press enter.
9 Press menu+ twice to get to "TONER SENSOR ENABLE" (with a * in the lower right hand of the display window.
10 Press enter and the word "ENABLE" will begin to blink, indicating it can be changed.
11 Press menu+ and the word will change to "DISABLE", still blinking. This is a toggle, make sure to not hit the button twice.
12 This is the important step: simultaneously press the online, cancel, and back buttons, and let them all go simultaneously. this sets your selection.
13 There are other things that can be done here in the same fashion, but that is out of the scope of this document.
14 Use the "BACK" and the "MENU-" keys to back out all the way to the message "INITIALIZING", then power off, wait 10 seconds, and power back on.
Friday, June 18, 2010
How do I find and resolve Toner Sensor Errors?
Please carry out the following instructions if you receive one of the following error codes:
540 Toner Sensor Error, Colour: Yellow541 Toner Sensor Error, Colour: Magenta542 Toner Sensor Error, Colour: Cyan543 Toner Sensor Error, Colour: Black
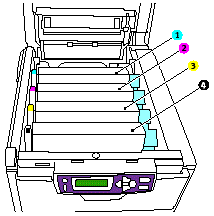
The printer contains four image drums; cyan, magenta, yellow and black.

There are two sensors for each toner: one on the drum and one on the machine
- The toner sensor is located on the right hand side of the drumThe
- Toner sensor on the machine can be found on the right hand side panel of the machine on the inside Toner Sensor Errors
A toner sensor error is displayed when the machine is no longer able to detect the toner cartridge / drum unit, or is no longer able to determine how much toner is left in the units.
How to clear the Toner Sensor Errors
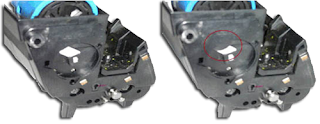
If your printer displays a toner sensor error please power off the printer and check the following:Check that all the blue toner levers are pushed firmly towards the back of the machineCheck if the sensors need to be cleaned. The sensor is located behind a plastic cover on the side of the drum (see below). Remove the plastic cover and give the silver arm a clean with something small and soft (lint free), any toner that has built up on the sensor will be a very fine powder and should be easy to remove.Check if the sensor lever has been pushed up. Once you have cleaned the arm, check that the sensor lever has been pushed up
If it is incorrect it can sometimes result in the blanking disc not being pulled out of the way, this results in the sensor on the machine not picking up the sensor on the drum. Pushing the disc up will resolve the problem. The disc will not fall back down again, providing that the blue Toner Lever is pushed firmly to the back of the machine.After all these checks are completed place the cover back on the side of the drum. It should go back on the same way it came off. If you are unable to fit the plastic cover on the drum, you can leave it off as it will not stop the drum from printing.
Install the drum and toner in the machine and switch on, if you still have an error message please contact your local OKI Printing Solutions office for further assistance.
Wednesday, June 2, 2010
Printer okidata C5800 Error Codes
A serious problem has been detected on the CU board
Solution:
Seek attention of service person if restarting the printer does not correct the problem.
DSI Exception Error Code 002
When the program has attempted to look up an invalid address
Solution:
Note the 24-digit addresses (usually 3), then restart the printer. Check reproducibility if possible. Repeat the same operation after restarting the printer and check if the same
service call message appearsISI Exception Error Code 003
When the program has attempted to look up an invalid address
Solution:
Note the 24-digit addresses (usually 3), then restart the printer. Check reproducibility if possible. Repeat the same operation after restarting the printer and check if the same service call message appears.
Alignment Exception Error Code 004
When the program has attempted to look up an invalid address
Solution:
Note the 24-digit addresses (usually 3), then restart the printer. Check reproducibility if possible. Repeat the same operation after restarting the printer and check if the same service call message appears.
RAM Configuration Error Error Code 034
RAMs have been mounted in the wrong order
Solution:
Check the specification and install the RAMs in correct order.
Warning: The green image drum surface is very delicate and light sensitive. Do not touch it and do not expose it to normal room room light for more than 5 minutes. if the drum unit needs to be out of the printer for longer than this, please wrap the cartridge inside a black plastic bag to keep it away from light. Never expose the drum to direct sunlight or very bright room lighting
Monday, May 31, 2010
Clearing a Paper Jam for Oki Printer
We recommend you follow these instructions when the jams occur
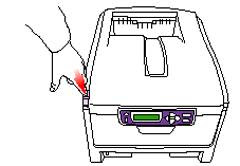
1. Open the printer, press the cover release; but be careful if Oki C5800 printers power button is on, the fuser will be hot.
2. It will be necessary to remove the four cartridges to gain access to the paper path
3. Look into the Oki C5800 to check whether any sheets of paper are visible on any part of the belt unit (1)
- Carefully separate the sheet from the belt surface and withdraw the sheet (2).
- Separate the trailing edge of the sheet from the belt, push the fuser pressure release
- levertowards the front and down to release the fuser’s grip on the sheet (3)
- Withdraw the sheet through the drum cavity area, then allow the pressure release lever to rise again (4)
4. Replace the four cartridges back into the drum cavity, making sure to locate them in the correct order.
5. Lift the front cover release and pull open the front cover.
6. Pull out the paper tray in use when the jam occurred and ensure that all paper is stacked properly, is undamaged, and that the paper guides are properly positioned against the edges of the paper stack. When satisfied, replace the tray.
7. Finally, close the top cover and press down firmly at both sides so that the cover latches closed. When the jam has been cleared, if Jam Recovery is set to ON in the System Configuration Menu, the printer will attempt to reprint any pages lost due to paper jams.